
Building any large Unity project can take a lot of time while preventing you from using the editor during the process. In one of our projects, developers were waiting for upwards of 15 minutes to get the Android version of the game. This is one of the main reasons we wanted to automate our builds and offload them from the developer machines into the cloud. And since it only takes one push to the source code repository to get the latest version to run on your device, our artists and game designers became much more involved with the faster iterations on the project.
Automated builds and continuous integration (CI) solutions have been widely researched and implemented, but there is very little information that is specific to Unity. A really good solution is Unity Cloud Build, but most of our games don’t fit the imposed limitations. The biggest problems were our code repositories not being exposed to the internet, and complex build pipelines that we need to be in full control of. As an example, Top Eleven has a lot of auto-generated code that requires starting Unity four times in a row for all of it to compile properly, while another project uses 2 different source control systems at the same time.
This is why we decided to build our own infrastructure, in-house. Three major pieces of the puzzle were:
- Build server
- Unity build pipeline
- Build distribution system
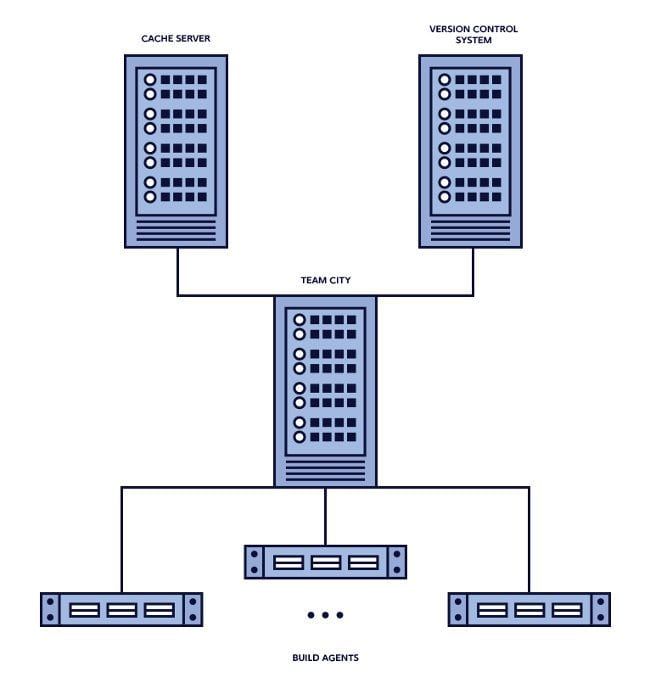
Build Server
Build server is the heart and soul of the system, since it monitors source control (git in our case), coordinates between multiple build agents and executes builds. CI servers are excellent for this, even if you don’t want to use anything CI specific. In our case, we compared Bamboo, Jenkins and TeamCity and finally decided on TeamCity due to its flexibility and ease of use, but pretty much any CI server should work great depending on the feature set that you need.
In regards to hardware, all of our build agents are very powerful Macs, because having iOS builds is a must and we wanted to avoid the additional overhead of managing a mix of OS X and Windows machines. Since most of Unity’s build process is single-threaded, we decided to use Mac Pros (6 core CPUs with hyperthreading) with as many build agents as possible. For us the optimal number of agents running on a single Mac Pro was 5.
Texture compression can take a really long time and use all of the available cores on your machine (e.g. PVRTC compressor), which can significantly slow down the build process. The trick is: Build agents shouldn’t compress anything. Textures that ended up in the source control repository have already been compressed by the people that imported them into Unity, so the build agent would just be doing the same work again, which is why it is extremely important to have a powerful Cache Server in your infrastructure. They tend to speed up builds by an order of magnitude.
Unity Build Pipeline
The build server can start Unity with the provided arguments, but it is up to your build pipeline to actually execute the build correctly. Luckily, Unity supports a bunch of command line arguments which can be found here. Note, there is no command to execute a build, but -executeMethod argument can be used to execute pretty much any method. You can also access all of the command line arguments that Unity was started with, allowing you to pass and use your own.
We wanted to open-source our own build pipeline, but unfortunately parts of it have software with proprietary licensing. Regardless, a simplified version that you can use as a starting point for your own pipeline can be found here. So, for example, if you want to build an Android version, you can have the build agent start Unity with:
"%UnityPath%" \
  -projectPath "%teamcity.build.checkoutDir%" \
  -quit \
  -batchMode \
  -out "%teamcity.build.checkoutDir%/Builds/Build.apk" \
  -buildNumber "%build.number%" \
  -buildVersion 1.2.3 \
  -reporter TeamCity \
  -executeMethod Nordeus.Build.CommandLineBuild.Build
What this does is start Unity with the project that is currently being built in batch mode (no window is shown), execute our main build method and quit at the end.
There are still some things that can be improved. TeamCity monitors standard output for build log messages, but Unity only writes to its own log file, and without the build log you would have no idea why your builds are failing. Even worse, there is no way to know if your build failed, because Unity will happily return error code 0 (no errors) even if your build crashed and burned. To solve these problems we created something (very creatively) named UnityProxy.
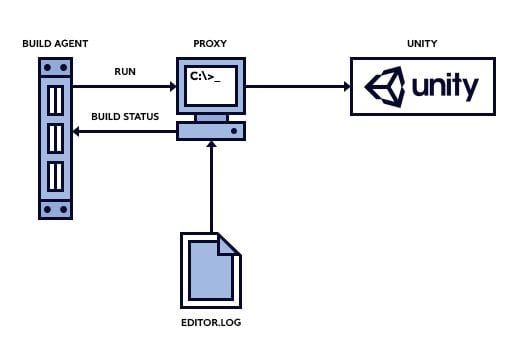
This tool will start up Unity, constantly read its log file and forward it to standard output. It will also look for a magic string that the build pipeline reports if the build succeeds and return with the appropriate exit code after the build is finished. To make it even more useful, it can report the exact stage that the Unity build is in to TeamCity, so you are always up to date on how things are progressing. This can be done because TeamCity supports service messages which allow application to report build progress to TeamCity by writing special strings to the standard output. So on Unity side, whenever a progress bar is displayed, a special message is written to the log, and then UnityProxy looks for those messages and forwards them to TeamCity whenever they appear. You just modify the previous command for starting Unity with:
mono UnityProxy.exe "%UnityPath%" # Rest of command line arguments
For most platforms, this is all you have to do to get your application built, but iOS builds require more work.
iOS Builds
We will assume that you already managed to run an iOS build on a device, so that all of the data is correctly entered on Apple Developer dashboard and that provisioning profiles are in order. When creating an iOS build in Unity, you will be provided with an Xcode project that needs to be compiled for target platforms. Fortunately, command line tools are provided with Xcode that make things easy to automate. So for us, a TeamCity command line build step looks like this:
echo "##teamcity[progressStart 'Creating iOS archive']"

xcodebuild \
  -project Unity-iPhone.xcodeproj \
  -configuration Release \
  -scheme "Unity-iPhone" \
  -xcconfig "%env.xcconfigPath%" \

clean \

archive \
  -archivePath "build/Unity-iPhone"

echo "##teamcity[progressFinish 'Creating iOS archive']"

echo "##teamcity[progressStart 'Creating the .ipa file from archive']"

xcodebuild \
  -exportArchive \
  -exportFormat ipa \
  -archivePath "build/Unity-iPhone.xcarchive" \
  -exportPath "%teamcity.build.checkoutDir%/Builds/Unity-iPhone.ipa" \
  -exportProvisioningProfile "%ProvisioningProfileName%"

echo "##teamcity[progressFinish 'Creating the .ipa file from archive']"
By default, Xcode will create a debug symbols (.dsym) file for each build, and that significantly slows down build times of Unity projects. Fortunately .xcconfig files allow you to easily override project settings, or in this case DEBUG_INFORMATION_FORMAT setting. The file that we use also sets the correct code signing identity, as well as a new code signing path that avoids problems with newer versions of Xcode.
As for provisioning profiles, make sure that you have them on the build machine, and that the name used for the command line build is the same one that shows on the Apple Developer dashboard, since it is case sensitive. Adding new projects to TeamCity also requires getting the relevant provisioning profiles on the machine. We managed to automate this step using the excellent cupertino tool, which provides the “ios” command seen below. So every time we set up a new project on Teamcity, at least one agent on each build machine will run the following commands:
cd ~/Library/MobileDevice/Provisioning\ Profiles
rm -f *
ios profiles:download:all --type distribution
ios profiles:download:all
As a final note, you may encounter problems with permissions for signing the final .ipa file and using the ios tool to update the provisioning profiles. Just make sure that in the Keychain Access app on the build machines the private key used for signing and the Apple Developer dashboard credentials are located in the System keychain, and that the Access Control settings allows access to that data.
Build Distribution
When it comes to distributing the final build, there are a lot of different options. We initially intended to create our own solution, but eventually decided to use a 3rd party solution that worked more or less out of the box. HockeyApp has support for Android, iOS and Windows Phone, as well as great Unity library for handling exceptions.
After creating a new project on HockeyApp and setting up their OS X app, you will be able to do a command line upload:
puck
  -submit=auto \
  -download=true \
  -api_token=abcdefgh12345678 \
  -app_id=com.Company.Product \
  -notes_type=markdown \
  -notes_path="%teamcity.build.checkoutDir%/markdown.log" \
  "%teamcity.build.checkoutDir%/Builds/Unity-iPhone.ipa"
For each build, notes that cover changes since the last build are also generated in one of the build steps. While getting the last successful commit is TeamCity specific, using git-logto generate the changes in markdown syntax can be used regardless of the CI:
curl -o lastBuild.tmp "%teamcity.serverUrl%/guestAuth/app/rest/buildTypes/id:%system.teamcity.buildType.id%/builds/status:SUCCESS"

last_commit=`xpath lastBuild.tmp  '/build/revisions/revision/@version'| awk -F"\"" '{print $2}'`

NOTES=`git log --no-merges --no-color --pretty=format:'* **%s** - *%an* (%%ci)' --abbrev-commit $last_commit...%build.vcs.number%`

echo "$NOTES" > "%teamcity.build.checkoutDir%/markdown.log"
Conclusion
Putting all of this together may seem daunting, but the time spent on this is going to pay off many times over in both developer time savings and the sheer speed of iterations that you are going to get with this system. You can also go a step further and easily run automated tests on every build or use a full-fledged CI workflow if you want.
If you have any questions, let us know in the comments.